Debian 2.2 Installation Guide for Multias with no Floppy, and an IDE Drive, over the Network
Some background reading:
Upgrading Multia firmware over BOOTP/TFTP: instructions, and a new download url for the image. You need to do this in order to be able to do the actual install. Messages from the multia-users mailing list at UNSW.
Telford Tendy’s Multia reference material. Some useful information Telford has found out about the Multia.
How I Installed My Diskless Multia, by Angus Lees.
And now, for the gritty details
Booting off the network
turn on muttlia. if it stops at a >>> prompt, then you are in the SRM console. otherwise, you are at a blue menu, called ARC. we’ll use ARC later to boot from, but right now, you want to be in the SRM. choose “Supp Menu”, “Set up the system”, then “Switch to OpenVMS or Digital UNIX console”.. CHoose “switch to digital UNIX” or “openVMS”, it doesn’t matter, as long as it’s not the NT option. go back then power cycle the machine. the machine should boot into SRM after a video test.
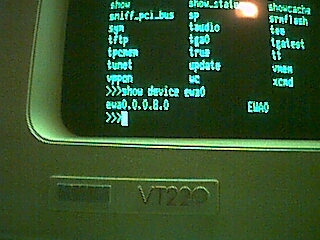
version                 BL5 V3.8-3 Aug 10 1995 03:22:55

ewa0                       EWA0              08-00-2B-E2-C2-A6

64 Meg of system memory

CPU speed is 166 MHZ
Cache size is 256 Kbytes

>>>
find out your mac address by booting to the SRM console, line like:
>>> show device ewa0
ewa0.0.0.8.0              EWA0             08-00-2B-E2-C2-A6
download tftpboot.img from yout local mirror in the [/pub/debian/dists/stable/main/disks-alpha/current[(http://planetmirror.com/pub/debian/dists/stable/main/disks-alpha/current/) directory
and cd MILO and get noname and linload.exe
set up bootp and tftp, put tftpboot.img into /tftpboot on your bootp server
xander:ha=08002BE2C2A6:ip=10.0.0.2:td=/tftpboot:hd=/tftpboot:bf=tftpboot.img:
(where xander is your multia’s hostname.)
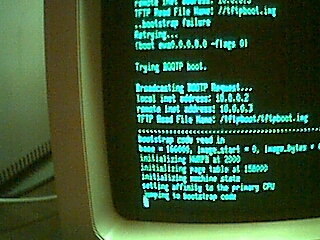
boot the multia with a command such as boot ewa0 -proto bootp
Installing Debian base
when installing debian, ignore the message saying you appear to be booting from SRM, you won’t be in the future. Use fdisk and make a DOS partition table
something like:
/dev/hda1        5M FAT16 < 32M  /boot
/dev/hda2      128M Linux swap   swap
/dev/hda3  the rest Linux        /
install operating system and modules from network
make sure you have a net connection.
wait a while. make yourself a coffee :)
go thru the set up bit
don’t make the disk bootable, or a boot disk, just skip that and reboot.. this is important for making your multia bootable later.
Making your IDE disk bootable
boot using the old netbooted kernel only use your local filesystem for root, like so
>>>boot ewa0 -proto bootp -flags "root=/dev/hda3"
do more enter clicking :)
choose advanced install (it just means you have better control over the package selection)
choose your packages
install ’em
install milo (read more at this url: http://www.linuxdoc.org/HOWTO/MILO-HOWTO.html) like so:
make sure you install the dosfstools package
# mkdosfs /dev/hda1
# mount /dev/hda1 /boot
add this line to fstab
/dev/hda1 /boot vfat defaults 0 0
put linload.exe and noname (that you got earlier from the MILO dir on your favourite ftp site) into /boot
rename the kernel image, in this case vmlinuz-2.2.17-generic, to vmlinuz. can’t use long filenames from the MILO boot thingy
reboot
Tell your multia to boot off the IDE disk
When you get back to the SRM prompt, start ARC:
>>>arc
go to Supplementary Menu -> Set Up The System -> Manage boot selection Menu -> Add a boot selection
choose MULTI Bus 0 HD 0 Partition 1, this is your msdos partition /dev/hda1
'linload.exe' is the osloader name
'YES' the os is in the same partition as the osloader
'\' is the os root dir
'Debian' for the name
'NO' you don't want the debugger at boot time

go to "Change a boot selection"
use the down arrow to get the OSLOADFILENAME option
change that to 'noname'
go to OSLOADOPTIONS option
change to read 'boot hda1:vmlinuz root=/dev/hda3'
ESC up to the boot selections menu, then choose “Supplementary Menu, And save changes”
go to the boot menu, choose debian. watch as your lovely new debian system comes online.